Estimated reading time: 8 minutes
Using the iMovie or Photos apps, you can easily speed up or slow down a video on your iPhone, or convert a Slo-Mo video to normal speed.
Table of contents
How to change video speed on iPhone
Well, who is not aware of the most beautiful feature that iPhone offers. Yes, we are talking about the slo-mo feature that iPhone offers. This article will cover the same: how to change video speed on iPhone with step-by-step instructions. Here, in this article, you will be guided with slowing up a video procedure and speeding up a video together with easy and quick steps so that you can enjoy making videos and uploading videos to your YouTube channel from your iPhone quickly.
We all know that the phone’s unique feature, slow-motion recording, makes it different from the other phones. Also, this feature has changed the usage of other technologies such as cameras we used in the past for slow-motion recording, but now, we prefer using iPhone due to iPhone’s unique feature. But, the question here comes is how you can speed up a video of your iPhone instead of slowing it down. Yes, iPhone does this too.
Restoring Original Speed and Speeding Up Regular Videos
Speeding up of a video depends upon the type of video you have recorded. If you have recorded a slow-motion video in your iPhone and you want it to restore it to its original speed, that is the normal speed, then this can be quickly done through the Photos app. But when you decide to speed up a regular iPhone video, you will need to install Apple’s free iMovie app on your iPhone. This is a free app and can be installed easily. We will see all the step-by-step instructions on using this app to speed up the video. So let us have a look at these undermentioned steps:
#1. How to speed up a video on your iPhone using iMovie
In this section, we will cover the steps by steps instructions on how to speed up a normal video using iMovie on iPhone. Here we have used iPhone 11 having iOS version 15.1. But the process is almost similar for every iPhone device and iOS version. Let’s have a look at the steps.
Downloading and Installing iMovie on iPhone
- The first step is to go to the store app and download the iMovie app. Once downloaded, install it on your iPhone and open it. This will take just a few minutes. Now go to the next step of starting the app.
- Start the iMovie app on your iPhone. The welcome screen of the app will appear on your iPhone. You just need to tap on the ‘continue button to move further to the next step.
Starting a New Movie
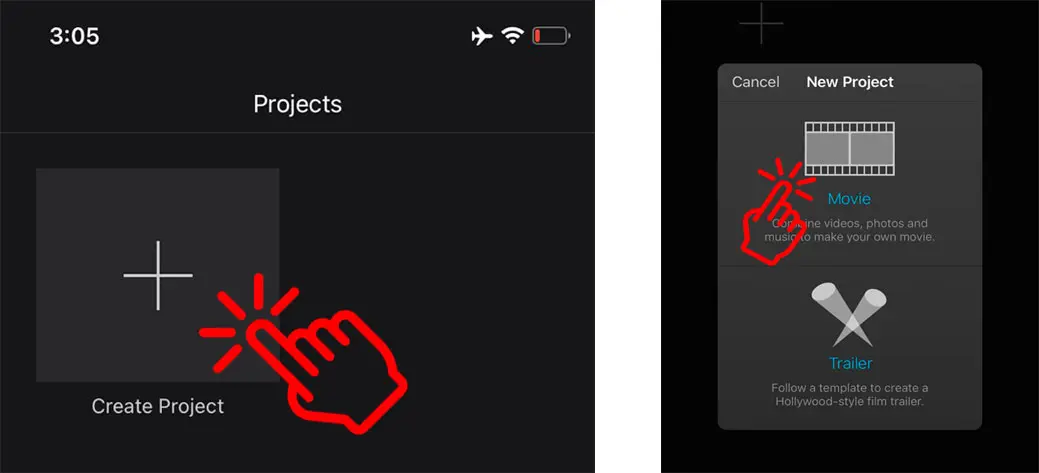
- Now in this step, you will be directed to a ‘projects’ page. There you will see a ‘plus’ sign. Tap on this plus sign to start a new movie. On the New projects pop up, tap movies in that section.
- Next, go to the store app and download the iMovie app. Once downloaded, install it on your iPhone and open it. This will take just a few minutes. Now go to the next step of starting the app.
- Start the iMovie app on your iPhone. The welcome screen of the app will appear on your iPhone. You just need to tap on the ‘continue button to move further to the next step.
- Now in this step, you will be directed to a ‘projects’ page. There you will see a ‘plus’ sign. Tap on this plus sign to start a new movie. On the New projects pop up, tap movies in that section.
Editing the Video Speed
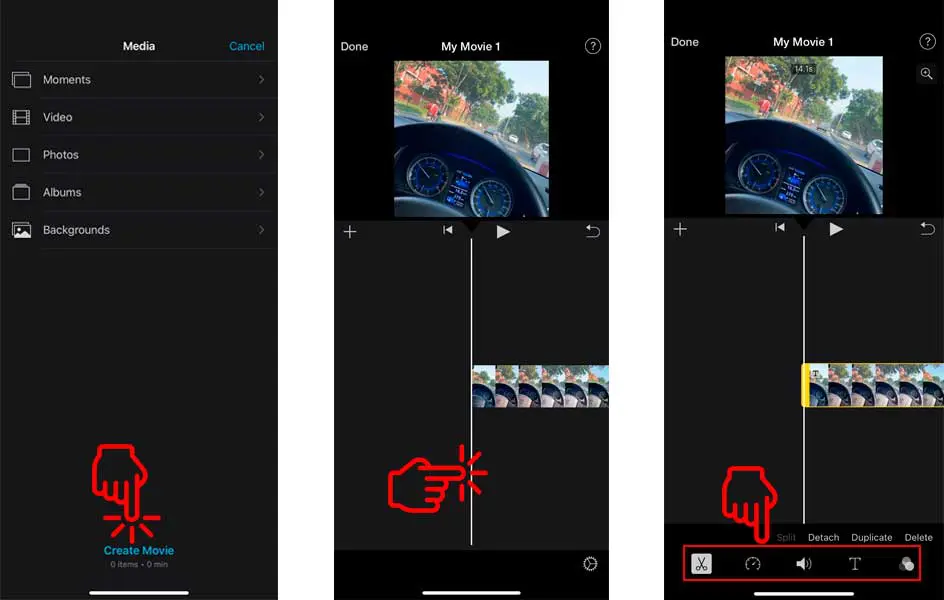
- Now you have to find the appropriate video that you want to speed up. From the drop-down list, choose the video that you want to speed up. Tap on the selected video, and then on the bottommost of the screen, you will see a ‘create movie ‘option. Tap on that ‘create movie’ option and move to the next step.
- You will be directed to a video editing page. On this video editing page, tap on the video clip in the timeline. Now according to your choice, edit the video with the various video editing options available there. This includes adjusting light, slow down, speed up, and many more other features. All this can be done from the editing tools that appear at the bottommost side of the screen.
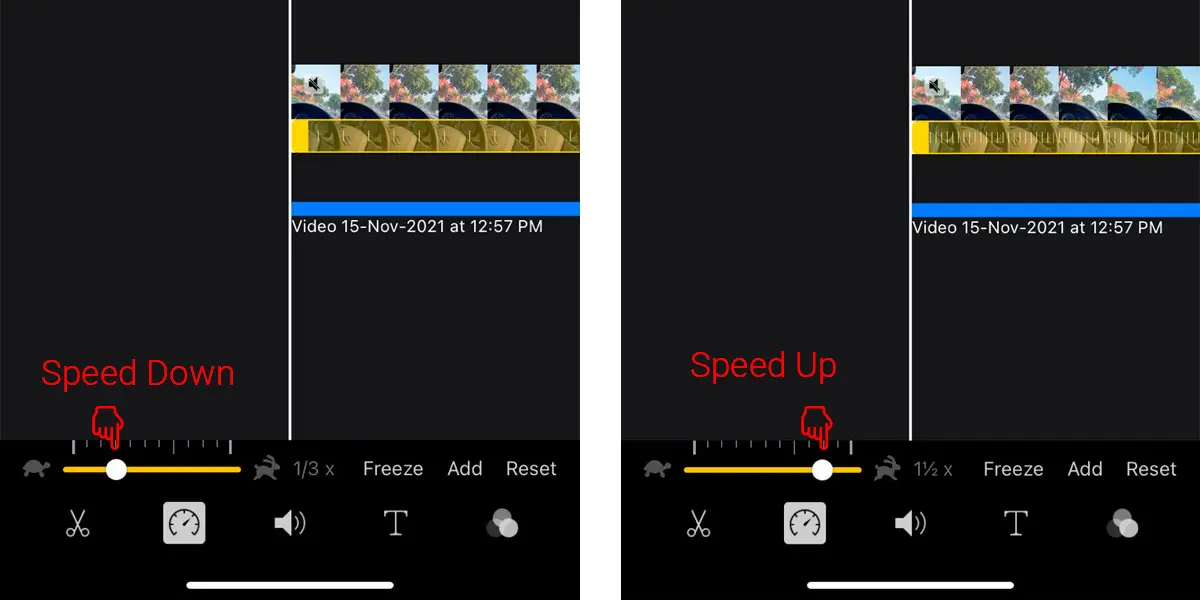
- There you will see a speedometer looking like an arrow. Tap on that speed button to increase the speed of the video.
- You will see the rabbit and tortoise-shaped icons at the bottom of the video. This indicates that the rabbit side will increase the speed of the video, and the tortoise side will decrease the rate of the video. So to increase the speed, drag the pointer towards the right, or we can say towards the rabbit. If you want to boost the video speed even further, move the cursor to the right for a 2X increase in video speed. Also, you can preview your video to see before what changes are needed further in the video. This can be done through the play button near the top of the screen.
Finishing and Sharing the Edited Video
- The next step is finishing up all the things that you have completed. Once you are done with all the editing, tap on the Done option, which will appear on the top left corner of the screen.
- In the last step, when done with everything, you will see a share button on the bottom of the screen. Tap on this Share button which will direct you to the place you want to save it.
#2. How to return a slow down on your iPhone to normal speed
This feature will tell you to slow down your speed up video to its normal speed. Follow these step-by-step instructions to slow down your iPhone video.
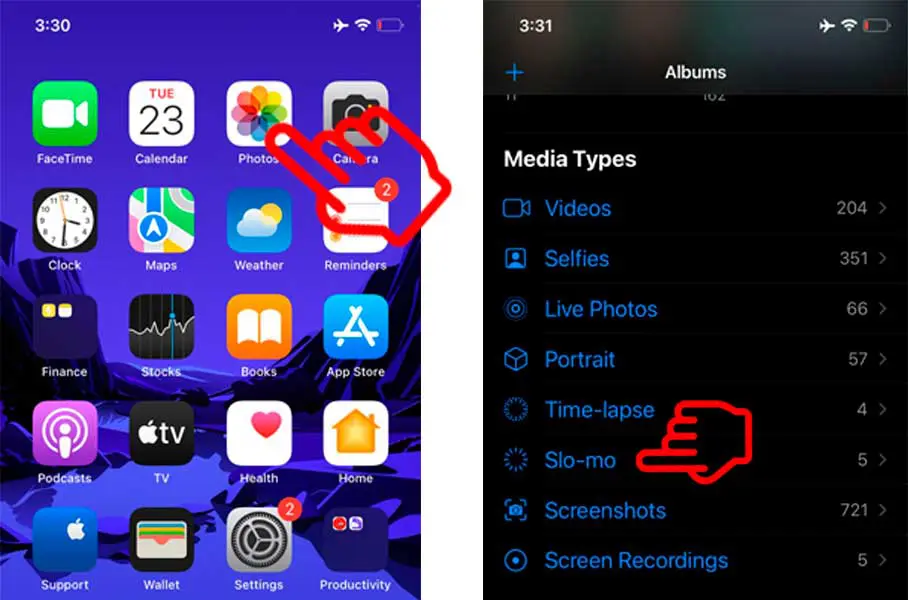
- The first thing is to open the Photos app and tap on Albums which will appear just at the bottom of the screen.
- Tap on the slo-mo option to see the list of videos you made in slow motion. Now choose a video that you want to return to normal speed.

- Tap on the Edit option, which will appear on the top of the screen.
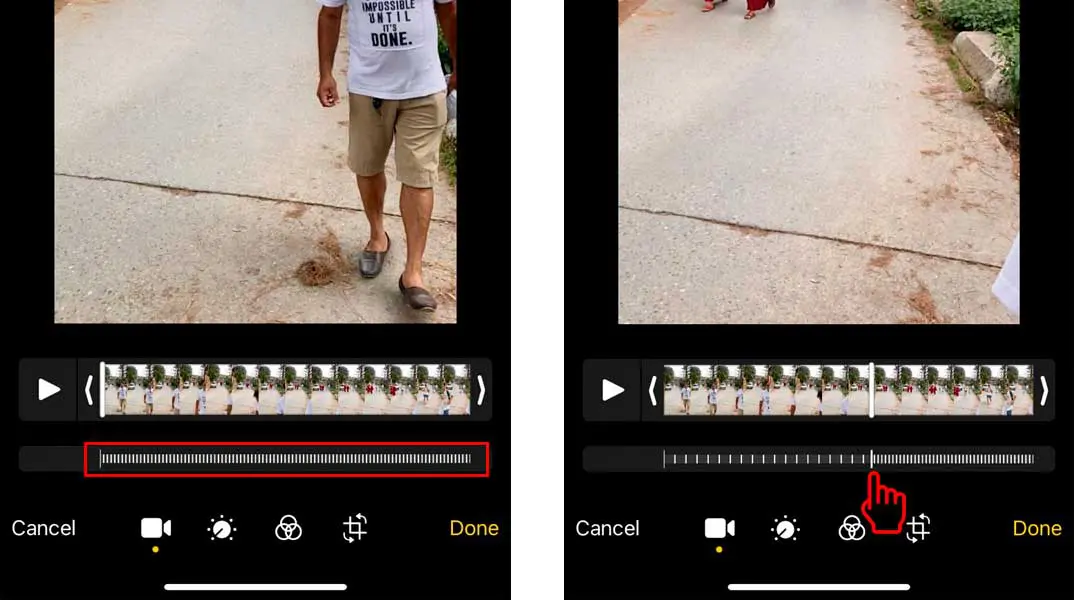
- Now, when you have chosen the video, at the bottom line of the video, you will see the video timeline. You will see tightly dashed spaces, which means that that part of the video is at its normal speed. The further apart dashes imply that part of the video is in its slow motion. And the slow-motion parts have a bit larger drag bars at either end.
- To return the video to its normal speed, all you have to do is put your finger on the left drag bar, which is positioned at first, and drag it to the right, pulling the full speed video to the end of the video. After this, the slow-motion part of the video should disappear.

- Now the next step is to tap on Done once you are done with the above steps.
- Once tapped on done, your video will be saved in your iPhone successfully.
Well, all the process is completed of returning the video to its average speed. You can also return your video speed by using the drag bars. You can increase or decrease the rate of the video with the drag bars anytime and anywhere in the video you want to.
Conclusion:
Summing up the article on ‘How to change video speed on iPhone,’ we have covered all the processes of slowing down and speeding up a video on iPhone with step-by-step instructions for you to perform them efficiently. This article will help you use the best part of the iPhone, which is slow motion and speed up the video, to make beautiful videos in your iPhone and add different effects for an elegant video. We are sure these easy steps will not take more than 3 minutes of yours to change video speed.
Do you have any questions related to this article? Comment down it in the comment section below!
thank you for this helpful tip. i didn’t know that slow-mo can be applied to a normal video. this feature will be truly helpful to my future ios videos.
Great article, thanks for the tips 🙂