Estimated reading time: 8 minutes
Table of contents
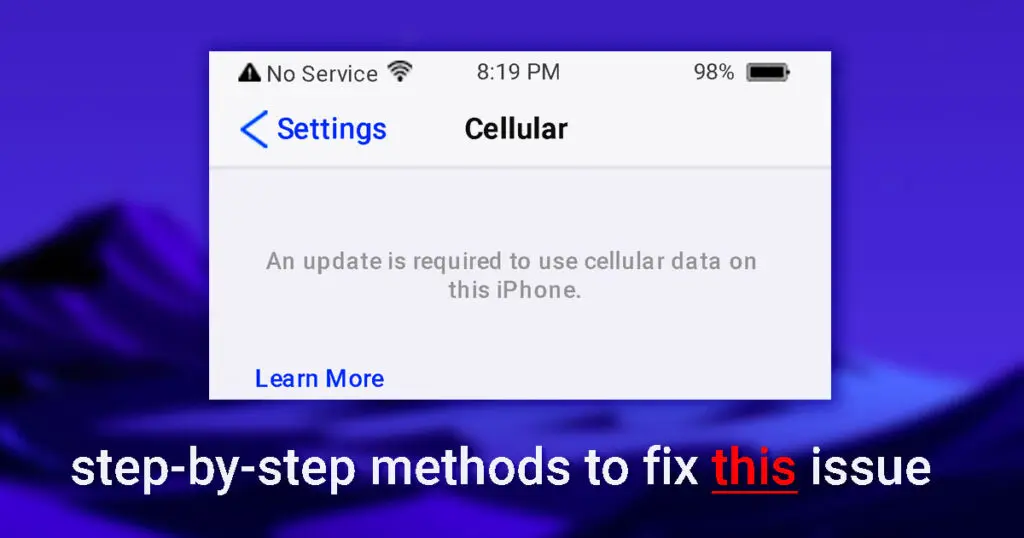
Sometimes, Wi-Fi really can be disturbing for us and can be a hindrance to our works. Either it doesn’t work, or you may be out of town. In such cases, what do you do with your iPhone? You pull down the control center and turn on Cellular data. But iPhone shows an error while using this data because it shows ‘an update is required to use cellular data on this phone. Although you have already updated your iPhone to iOS 16, you can still use this cellular data because of this unknown error.
So, here in this article, we will be covering the same mistake and its solution for all of you. All iPhone users already know that cellular data comes in handy on their phones, so you all want to fix it. And no doubt, we are here to do the same. Let’s look at all the solutions and their step-by-step methods on how to use them. Also, we have listed other steps based on your iOS versions for you to perform the steps according to your iPhone versions.
How to fix an update when Cellular data on this iPhone:
#1 Force Restart iPhone
The very first method to fix this issue is restarting the iPhone. Sometimes we people continue the iPhone because of multiple software glitches, forcing us to restart the iPhone. This time is needed for using cellular data. This will be different for different models users of iPhone. Don’t worry; we have step-by-step instructions for all the versions of the iPhone. So let’s look at each of them below.
For iPhone 6 and earlier iPhone6 versions users:
- There is just one simple step for all you out there. You have to simply press and release the home button as well as the sleep/wake button. Press and hold this for a few seconds until the Apple logo displays on the screen.
- Once the logo is displayed, you are done.
For iPhone 7 users:
- There is again just one simple step out there. Press the volume down button and the lock button continuously together for few seconds.
- An Apple logo will appear on the screen. Release the two buttons, and you are done.
For iPhone 8 or later versions users:
- The very first step is pressing and releasing the volume up button.
- Next now press and quickly release the volume down button as well.
- Now press and release the side button until the Apple logo appears. And remove the buttons.
- Press all three buttons for 3 to 4 seconds, and you’re finished.
#2 Updating your iPhone
There is no doubt that your iPhone needs an update. Updating phones fix several software glitches and add to the more advanced features of the phone. By updating your phone, you can use cellular data. Here is how:
- In this, the very first step is to go to the settings app on your iPhone. Now you will get an option of ‘General’. Tap on the ‘General’ option.
- Now in the General section, scroll down and search for Software Update. Once you get the Software Update, tap on that and follow the next step.
- If your phone is an older version, it will prompt a software update, which needs to be installed to resolve the issue. If your iPhone is already updated, then no further action is needed. However, once the update is complete, your problem will be resolved, allowing you to use cellular data on your iPhone.
Is your iPhone taking time to update iOS version? Check here for best solution.
#3 Enable and disable airplane mode
This is yet another method on the topic; an update is required to use cellular data on this iPhone. This is one of the commonest things that we all have done on our phones when the data on our device does not work properly. So here, we will be providing step-by-step instructions on enabling and disable airplane mode on your iPhone to use cellular data. Follow these steps listed here:
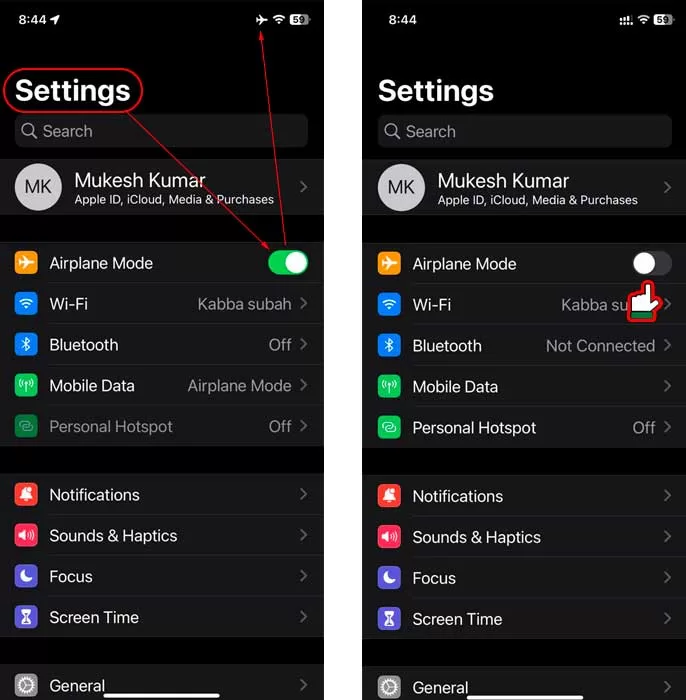
- The first thing you have to do is search for the settings app on your iPhone. Go to the settings app.
- In the setting app, you will find an Airplane mode option; switch it on. Once the Airplane mode is on, you will see an airplane sign in the notification bar at the network tower location. Please wait for 2 minutes over there till it gets on.
- Toggle off the Airplane mode after turning it on.
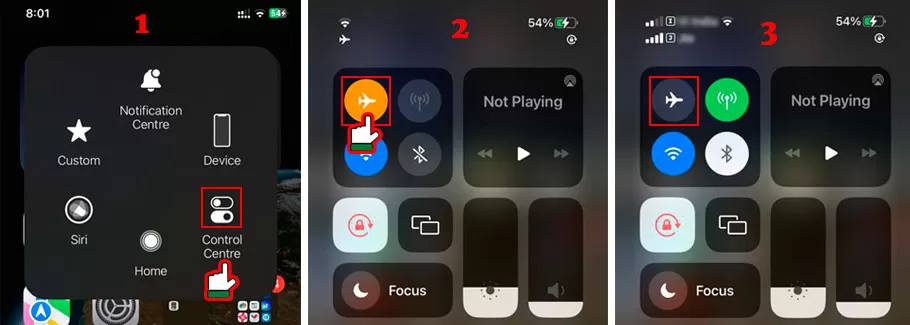
- Alternatively, you can also perform this by reaching the Control center and switching on the Airplane mode over there.
This method can easily let you use cellular data over your iPhone by performing a simple and basic step. Also, this process will only take a few seconds, requiring minimal time and effort to complete your task.
#4 Resetting Network Settings on your iPhone
This is another crucial settings option that can prevent issues related to cellular data use. However, it’s important to note that it erases all saved Wi-Fi passwords, VPNs, APNs, and cellular settings, so it’s essential to back them up. Now let’s have a look at the steps to reset network settings on your iPhone.
- Please search for the Settings app on your iPhone and open it.
- Tap on the general option and open Reset.
- In Reset, open Reset Network Settings.
- Now enter your iPhone passcode and tap on Reset. The work will be done.
If you forgot you password. Check here to reset you iPhone.
For iOS 15 and later versions, you can follow these steps to set network settings:
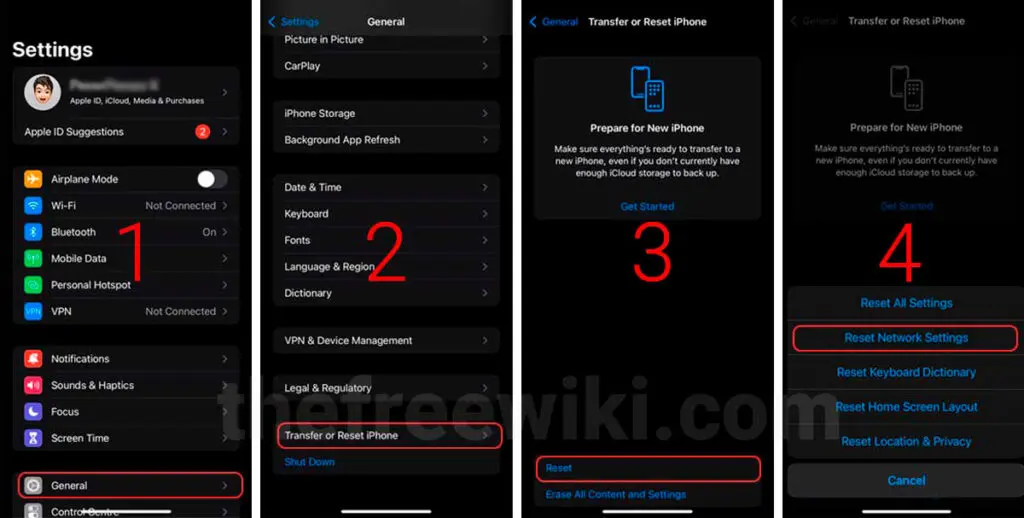
- Open settings and tap on general. Choose Reset iPhone or transfer.
- The next step is to Reset and, in it, choose Reset Network Settings.
- Now enter your iPhone lock passcode and try after reboot once. You’ve completed the network settings. Additionally, don’t worry about losing other media and personal data, as this setting won’t erase them.
Network settings, once reset, will allow you to use Cellular data over your iPhone easily. Also, it is less time work, and this will save your time too.
#5 Reset all Settings
Resetting all settings erases all the customizations you’ve made on your iPhone and restores it to its default state. Also, not to worry, this only resets all personal settings but not erases your data, so they are safe. Let’s look at the guide on how to do this.
Here these steps are for iOS 15, iOS 16 :
- Go to the settings app and tap on General.
- Search transfer or reset iPhone. Tap Reset and select reset all settings.
- Another step in this method is entering your passcode. Enter your passcode.
- The last step is to tap on “Reset all settings,” and after a reboot, you will have completed it.
Here are the steps for the same method for iOS 14 and earlier versions:
- Again the steps are the same. Go to the settings app and tap on the general option.
- Tap on Reset and search for Reset all settings over there. Hit reset all settings.
- Enter your passcode; it will ask you to enter, and you are done.
- The last step is to just confirm this Reset by tapping on Reset All Settings.
Once you reconfirm, your iPhone will reset all the settings, enabling you to use cellular data over any network.
#6 Deactivate VPN
Using or subscribing to a VPN on your iPhone may prevent your cellular signal from connecting. Disable your VPN temporarily to see if it resolves your iPhone’s mobile data connection problem.
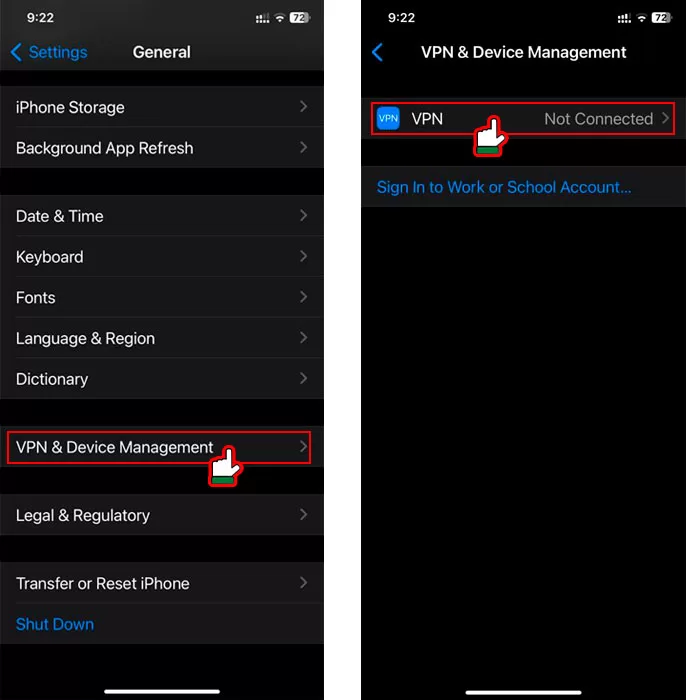
- Navigate to “Settings -> General -> VPN & Device Management -> VPN.”
- Turn off all VPN profiles,
- then reboot your mobile.
#7 Contact your Mobile Network Operator
If the above methods do not work for you, then there might be a problem with your cellphone carrier. There might be some local outages. Or there might be a problem with your account. Contact your service provider. Here are the customer service websites for the major cellphone providers:
- AT&T customer support
- Straight Talk Customer Support
- T-Mobile customer support
- QLink Customer Support
- Verizon customer support
Conclusion:
Coming to the end of this article named An update is required to use cellular data on this iPhone, we came to know that by some simple and easy steps on our different iOS versions, we can easily fix the issue of cellular data not working on your iPhone.
Feel free to use any method you like according to your iPhone preference and their versions. However, my opinion is that updating your iPhone method is the best, easy and simple method for you to use. It will update your phone as well as solve this issue and in no time. This will also update all other features and settings of your phone. So go ahead and try this method; you will find it easy. It will solve all your system issues and will fix them. Also, leave any related comment in the comment section below to solve your query!
